How We Develop Mobile Applications - Pt 3 - Android
Using test-driven development to build our models and API client
Last time we talked about how we get our environment set up for Android. Now that we have that going for us, we can start looking at fleshing out the components of our mobile application. In this post we are going to use Test Driven Development to set up our models to represent who is bringing donuts today, and then write the code to fetch the list from the server using Retrofit.
Unit Test Run Configuration
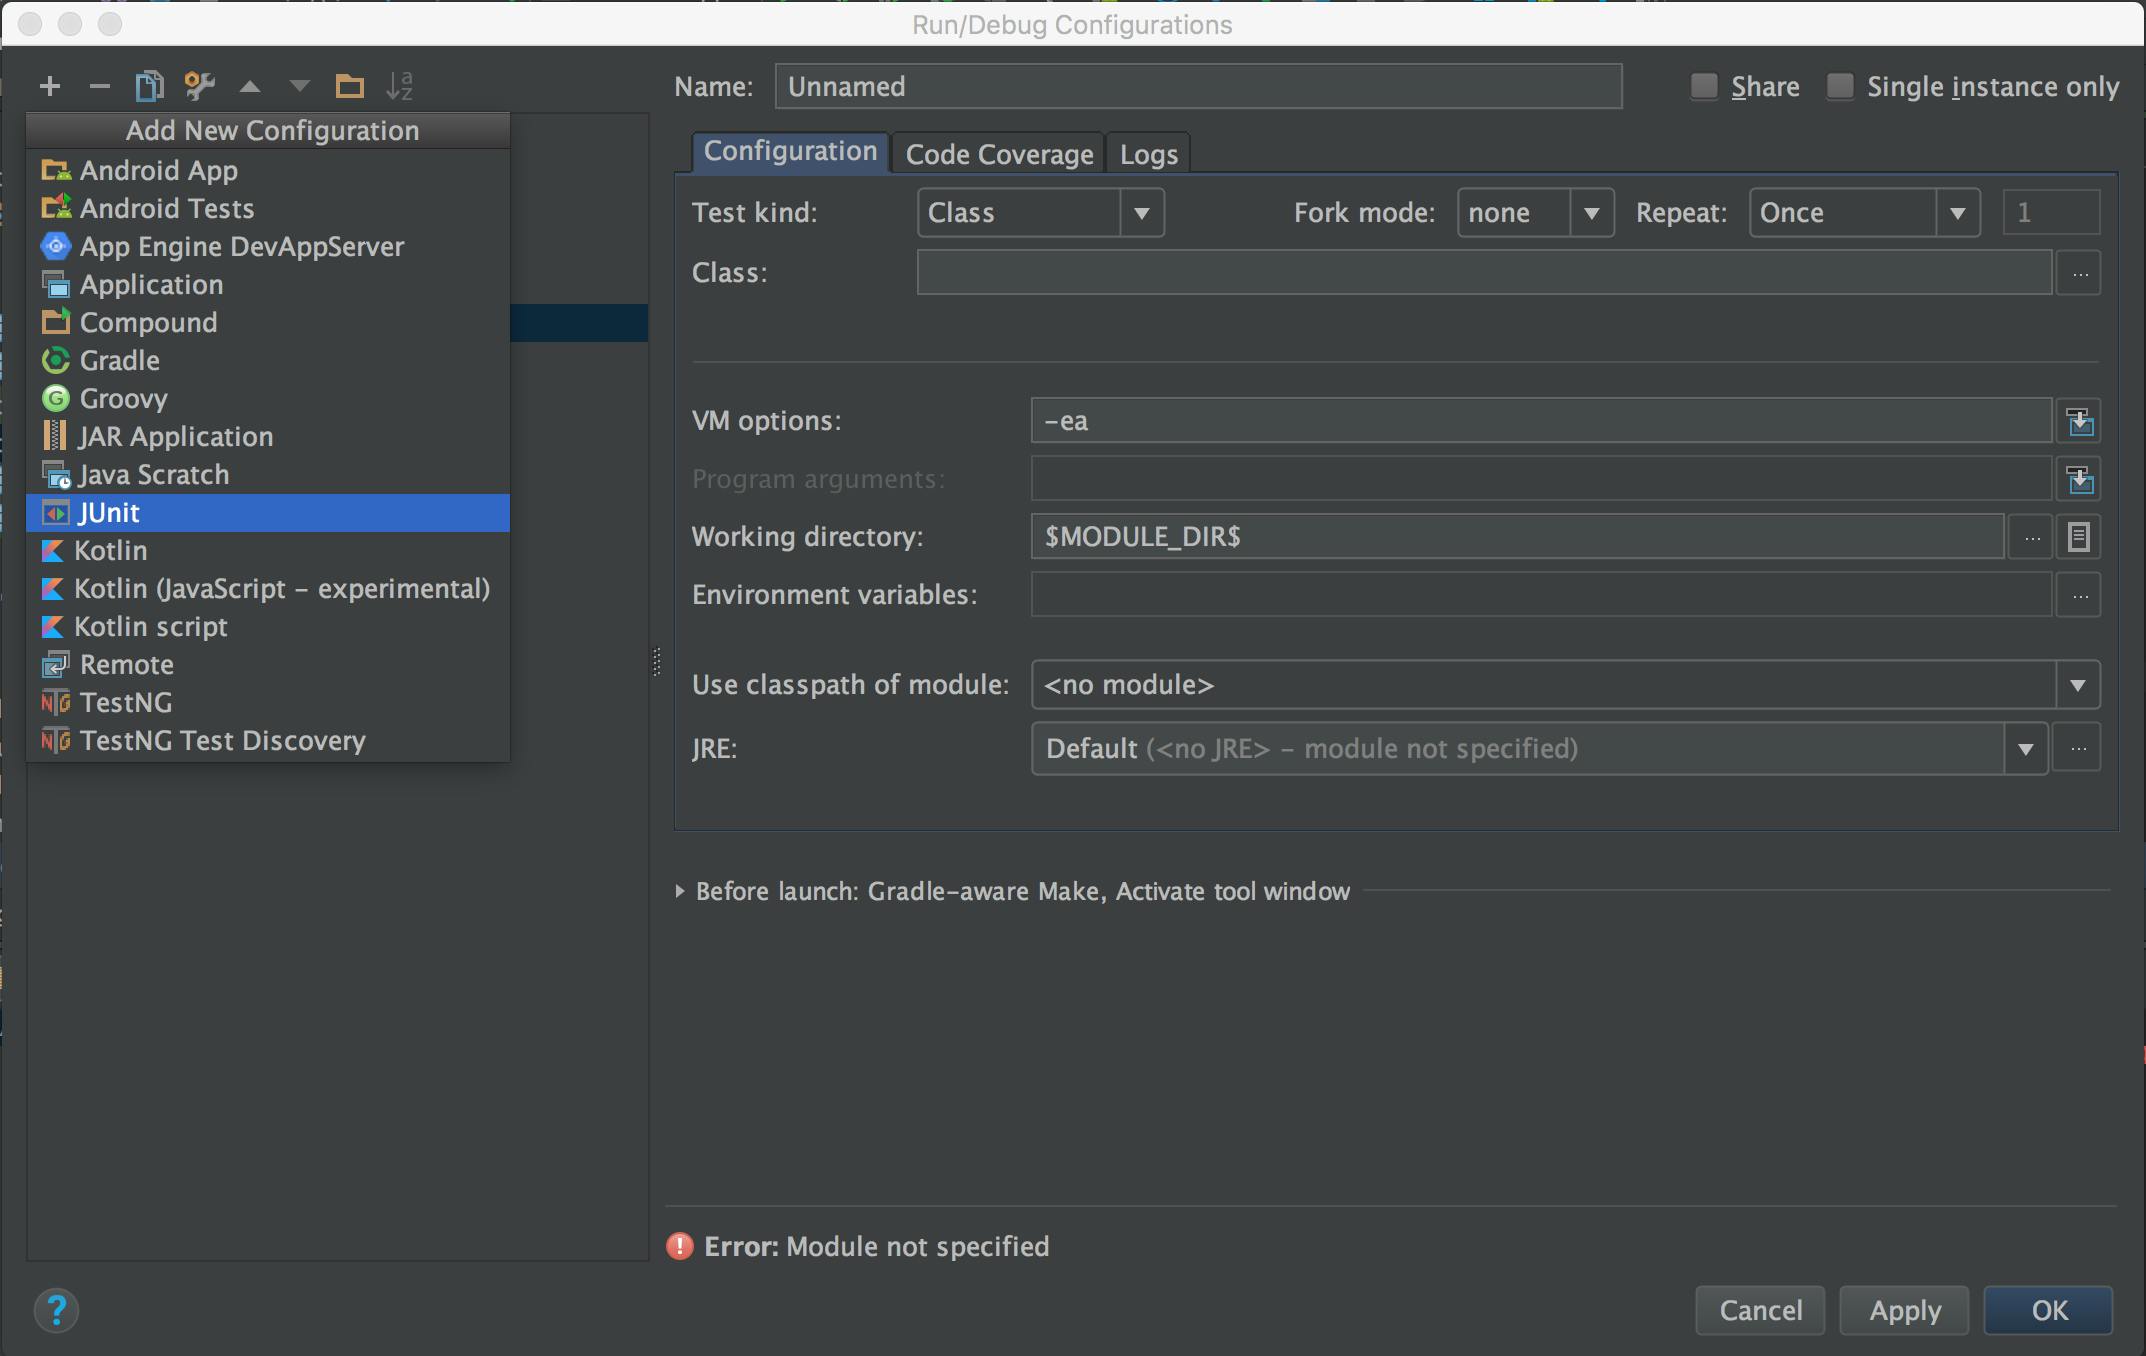
In order to run unit tests, we first need to set up a JUnit run configuration that will run all the tests under our app/src/test/ directory. From the Run/Debug Configuration menu, we can select “Edit Configurations”, and use the plus (+) sign from the upper left to add our JUnit Unit Test configuration.

Name the configuration “Unit Tests”. Change “Test kind” to “All in directory”, and then select the app/src/test directory for our project. Change “Use classpath of module” to “app”.
Android Studio allows us to set up shared run configurations that we can commit to the repository for others to use. Check the “Share” checkbox next to the “Name” field.
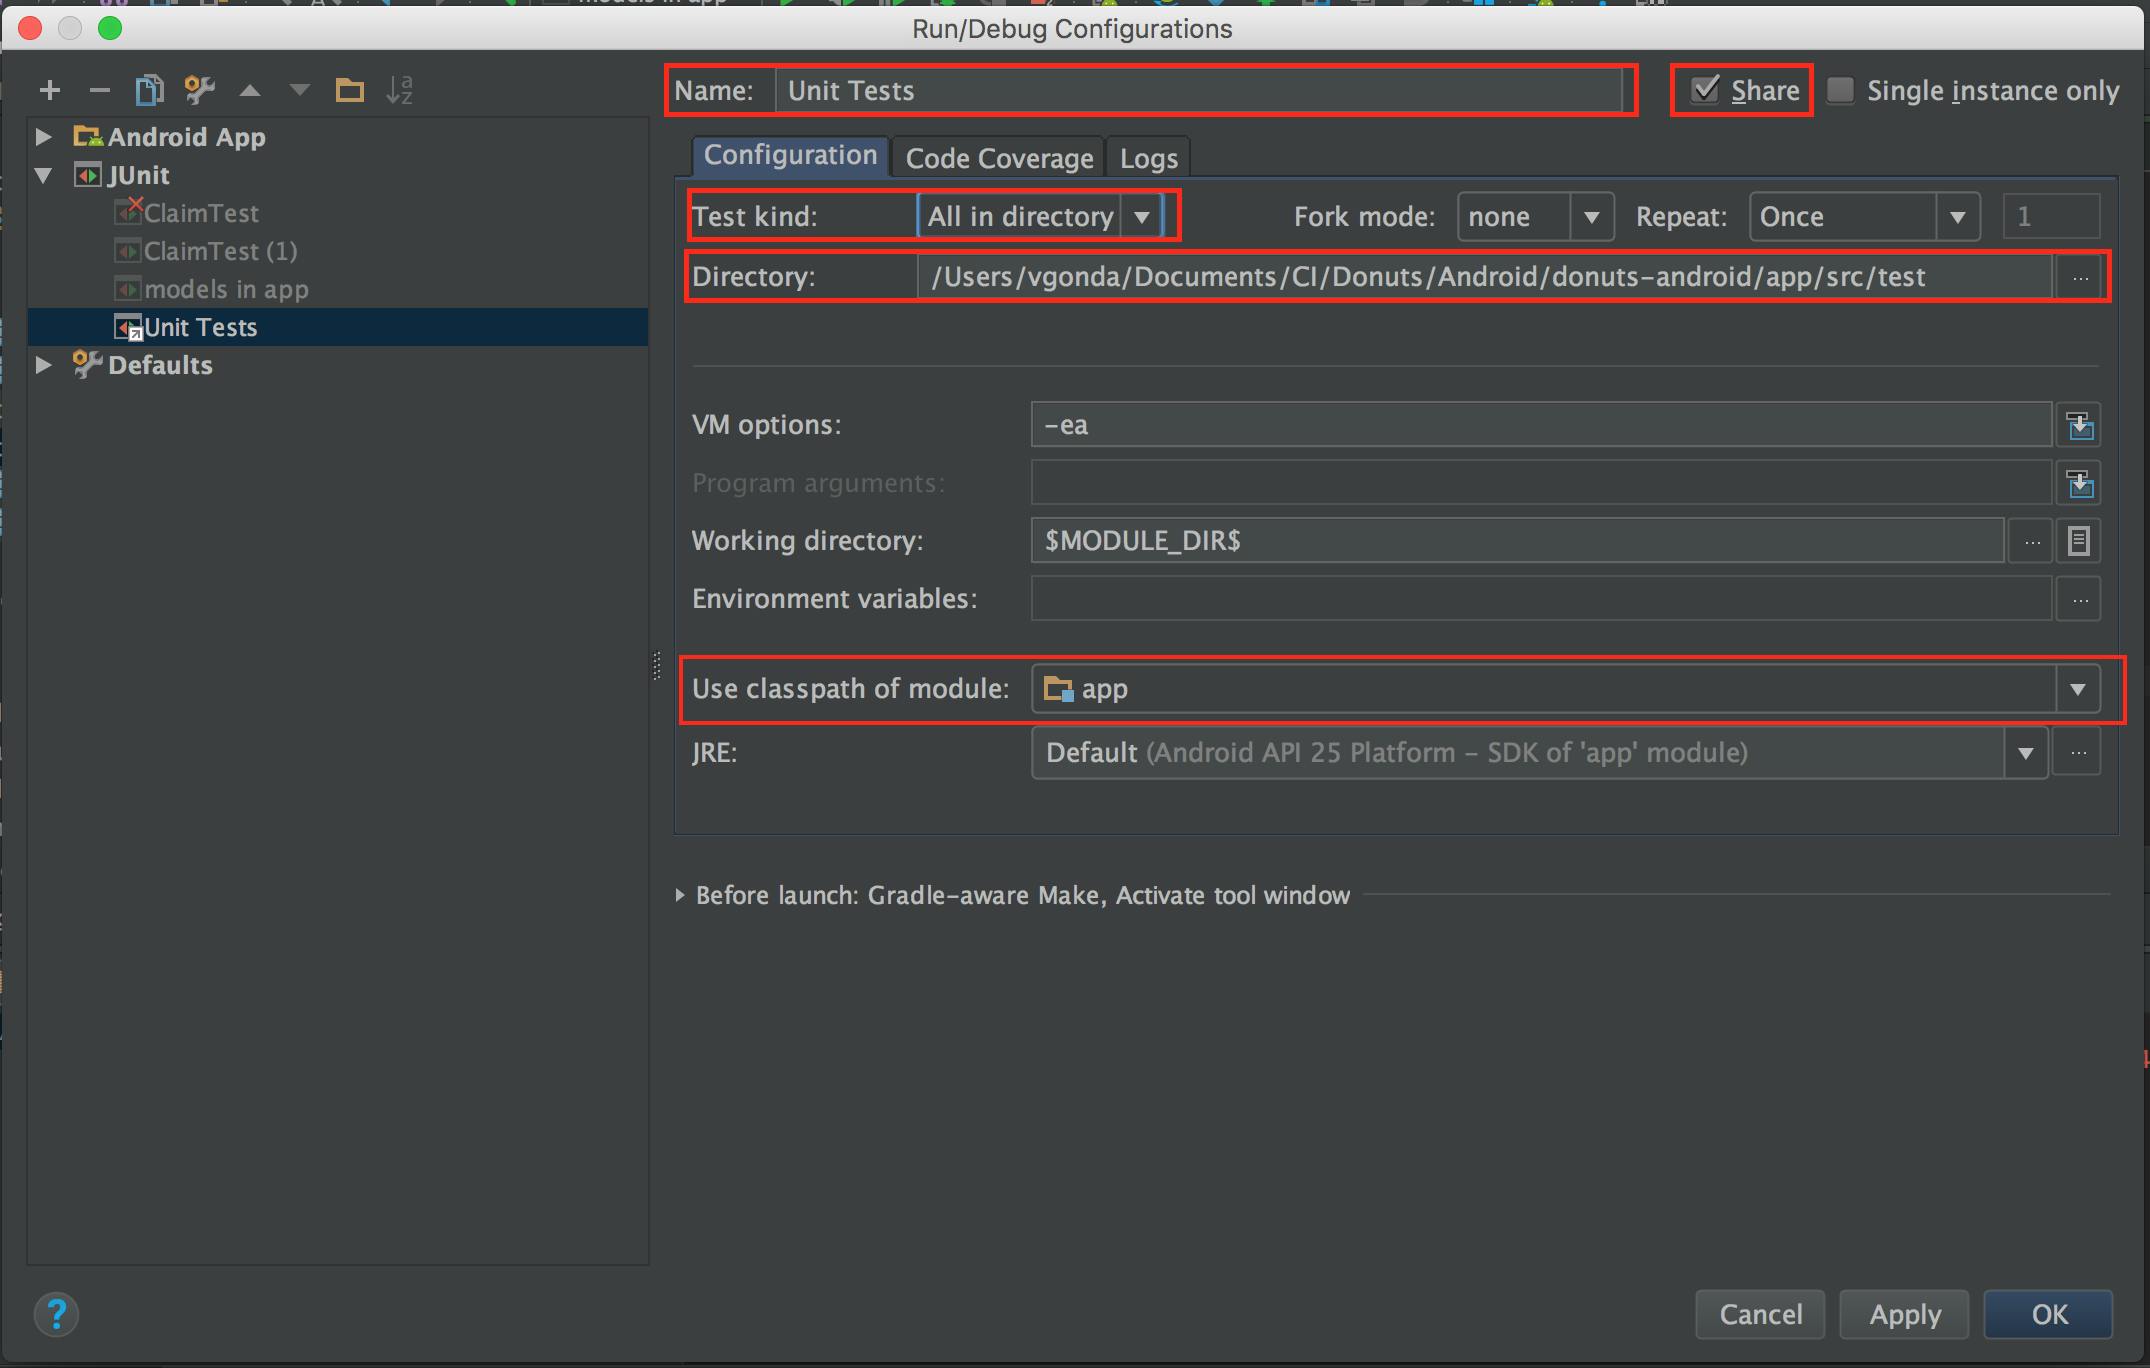
Click “OK” and you should see “Unit Tests” selected in the Run/Debug Configuration menu. Once we have set up our test configuration, we can use it to run all our unit tests at once. Commit the new file .idea/runConfigurations/Unit_Tests.xml to our repository for all to use.
Data Models from JSON
We will be pulling our data from a server, so let’s take a look at our API before moving on:
GET /api/v1/claims/today
[{
  "id": "63db9251-9c45-41ca-92d6-15e84ebea5b3",
  "github_login": "vgonda",
  "name": "Victoria Gonda",
  "display_name": "Victoria"
}]
When we make a call to see who is bringing donuts today, we get back a JSON list of users. To handle that, we’re going to need to pick a JSON object mapper. Here we will use Moshi to parse JSON and convert it into plain old Kotlin objects (POKOs). Let’s add it to our app/build.gradle so we have it available.
dependencies {
  ...
  compile "com.squareup.moshi:moshi:1.3.1"
}
Now that we have our dependencies set up, we can start writing the tests for our model. Let’s write a test that verifies that our JSON is mapped the way we expect. To do this, we will have our example JSON, parse it with Moshi, and make sure our object looks the way we expect.
/donuts-android/app/src/test/java/com/collectiveidea/donuts/api/models/UserTest.kt
class UserTest {
  val json = """
  {
     "id": "63db9251-9c45-41ca-92d6-15e84ebea5b3",
     "github_login": "vgonda",
     "name": "Victoria Gonda",
     "display_name": "Victoria"
  }
  """
  val moshi = Moshi.Builder().build()

  @Test
  fun fromJson_isValidUser() {
    val jsonAdapter = moshi.adapter(User::class.java)
    val user = jsonAdapter.fromJson(json)

    expect("63db9251-9c45-41ca-92d6-15e84ebea5b3") { user.id }
    expect("vgonda") { user.github_login }
    expect("Victoria Gonda") { user.name }
    expect("Victoria") { user.display_name }
  }
}
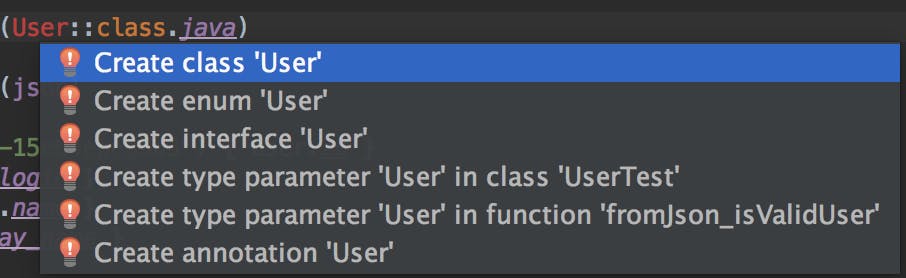
Android Studio has some great tooling to help us build our model class from our test. Here’s where we get to practice ALT+ENTER driven development! Starting out with the User class, we can place the cursor on the model name, type ALT+ENTER, and Android Studio will give us the option to generate the code for us.
We can do the same to generate the properties.
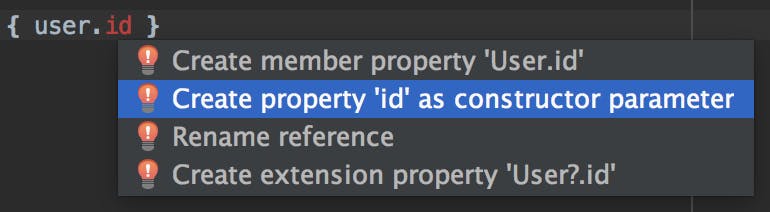
This gives us a model without having to write any of it ourselves!
class User(
    val id: String,
    val github_login: String,
    val name: String,
    val display_name: String
)
Now we can run the test, and watch it pass!
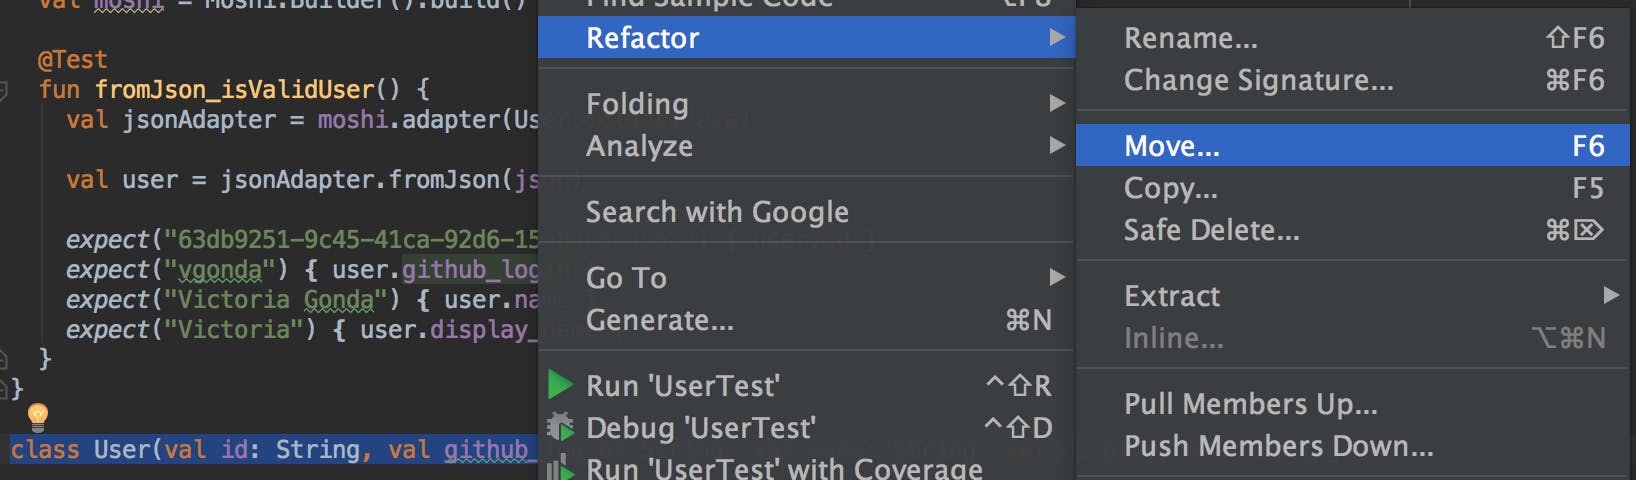
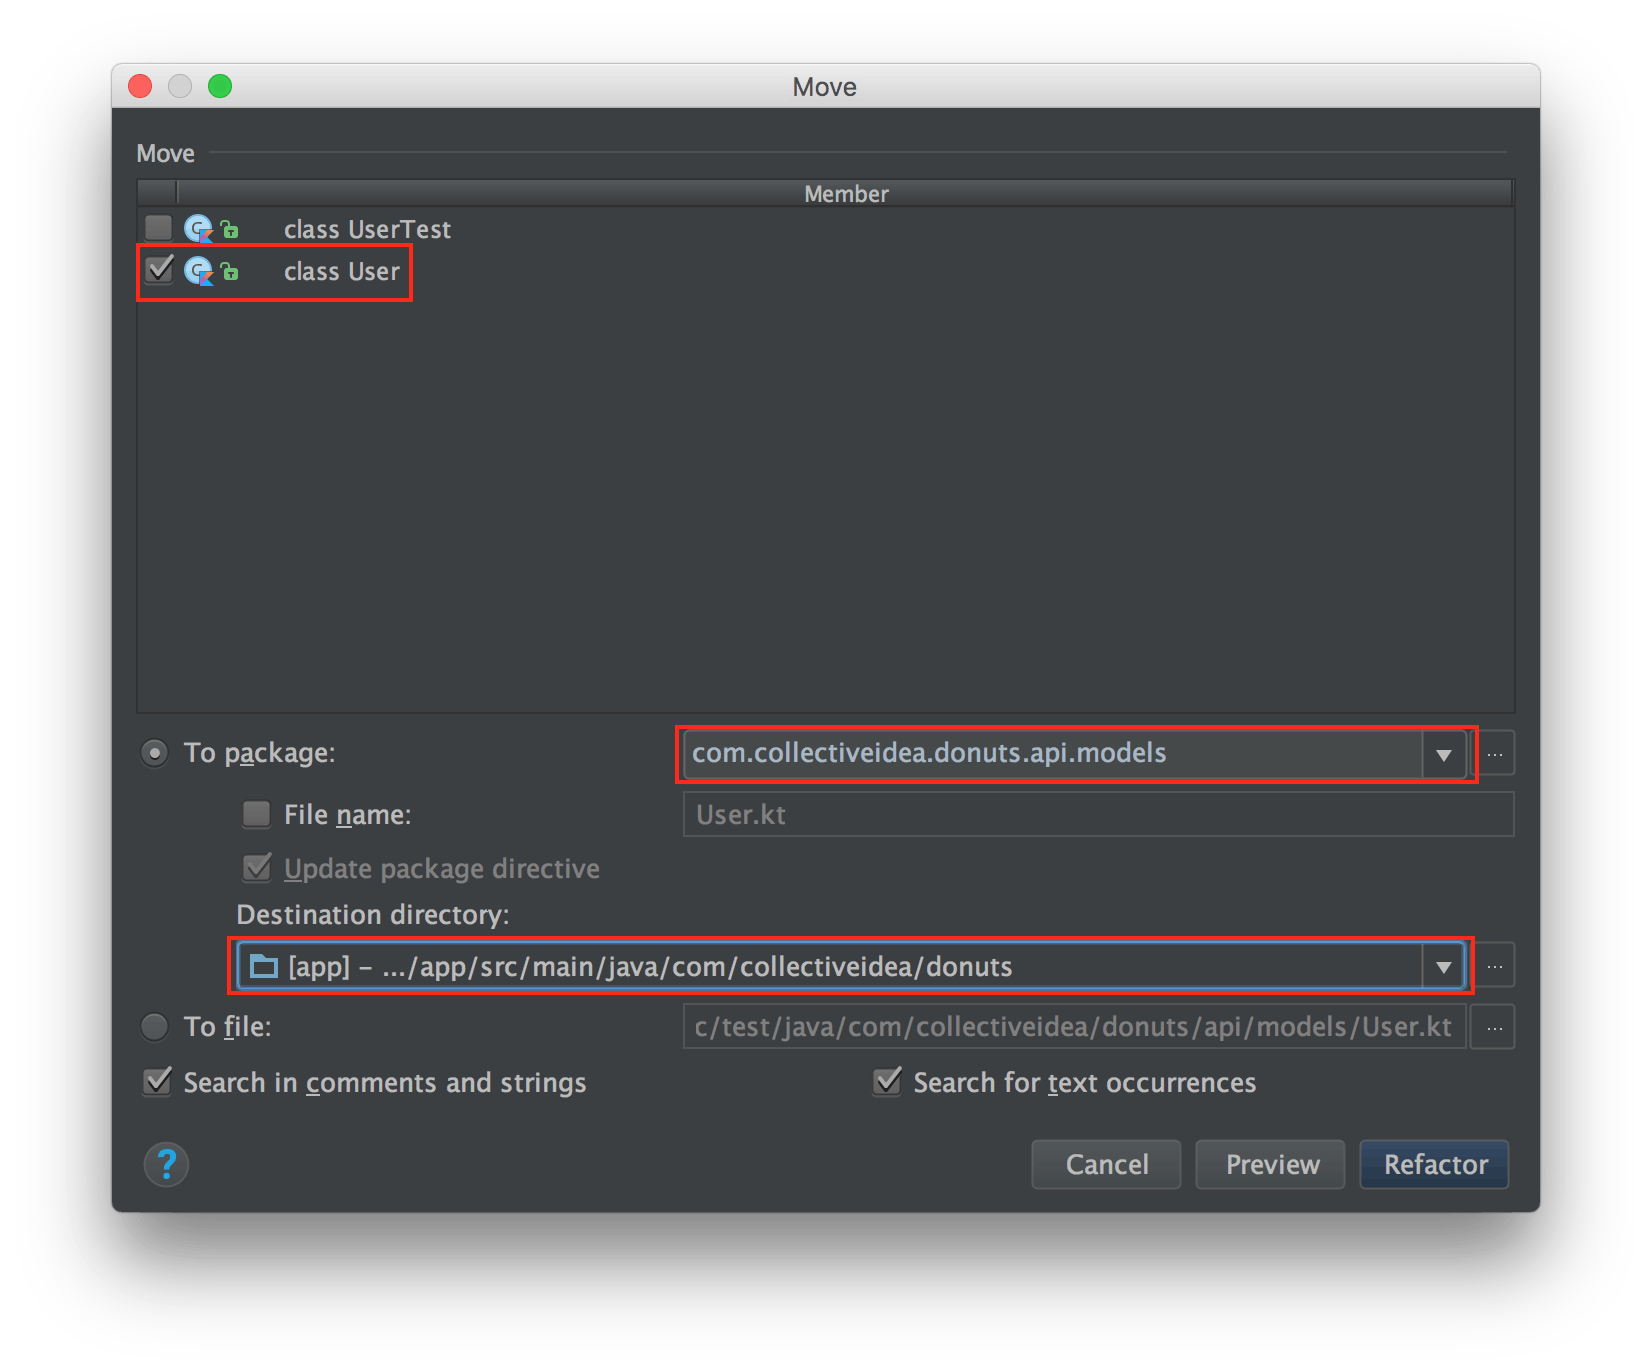
When Android Studio generates this class for us, it will put it in the same file we are working in. Since we’re working with Kotlin, we can have multiple classes in a single file. It can be helpful to see our tests right there with the code while we build it out. When we end up with something we like, we can move everything to a more appropriate location. Lucky for us, Android Studio makes this easy too! Just move the cursor to the class definition you want to move, type F6 or Right click -> Refactor -> Move, and specify where you want it to go. Make sure to change the source root to main.
Calling the Donuts API
Now that we have our model, we can write the code to fetch the data from the server. We will write a DonutsApi that returns our server response wrapped in an RxJava Observable. We want to return an Observable so we can easily manipulate the data across multiple threads in a single stream, rather than in a series of callbacks. To allow us to use Observables, we need to add RxJava to our dependencies:
dependencies {
  // ...
  compile "io.reactivex.rxjava2:rxjava:2.0.4"
}
Our first API test will check that the DonutsApi allows us to fetch the list of people bringing donuts when there is no one bringing donuts. What we are expecting in response is an RxJava Observable that emits an empty list.
We can test the behavior of an observable using an RxJava TestObserver. Create TestObserver for the type that your Observable wraps and subscribe to your Observable with it. This will allow us to make assertions on the state and output of the stream. In this case, we check that it will emit an empty user list:
/donuts-android/app/src/test/java/com/collectiveidea/donuts/api/DonutsApiTest.kt
class DonutsApiTest {
  val observer by lazy { TestObserver<List<User>>() }
  val donutsApi by lazy { DonutsApi() }

  @Test
  fun getTodayClaims_withNoClaims_emitsEmptyList() {
    donutsApi.getTodayClaims().subscribe(observer)

    observer.assertNoErrors()
    observer.assertValue(emptyList<User>())
  }
}
We can step through the highlighted errors in this test code to generate our first version of the DonutsApi. For now, we’ll just have our method return an observable emitting an empty list:
class DonutsApi {
  fun getTodayClaims(): Observable<List<User>> {
    return Observable.just(emptyList<User>())
  }
}
Run the tests, and we’ll see it pass. So far so good, but it’s still all lies. We need to verify that it calls a web server at the /api/v1/claims/today endpoint to get real data.
Since we don’t want to have to rely on the state of our production API to provide test conditions, we can instead run a local web server and use it to queue responses and track requests. OkHttp has a MockWebServer that allows us to run a local HTTP server in our JUnit tests. Let’s install it and set it up in our DonutsApiTest:
/app/build.gradle
dependencies {
    // ...
    compile "com.squareup.okhttp3:okhttp:3.5.0"
    testCompile "com.squareup.okhttp3:mockwebserver:3.5.0"
}
class DonutsApiTest {
  @get:Rule val server = MockWebServer()
  //...
}
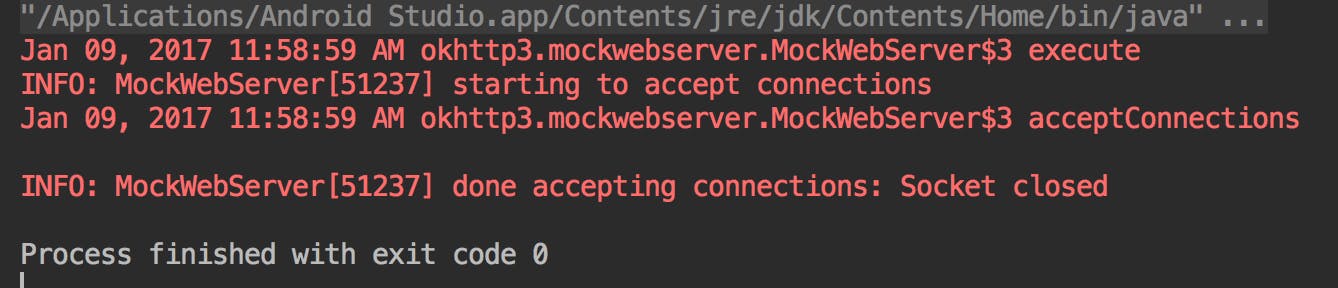
OkHttp’s MockWebServer can be used as a JUnit test rule that starts and stops a server around each test. If you run your tests now, you should see that a server was started and stopped in the console output of our test.
We can use the server.url("/") to access the base URL of the server. In our tests, we can queue up MockResponses, and also check that a request was made to a given path. Now, lets update our original test to enqueue an empty list, and verify the path:
@Test
fun getTodayClaims_withNoClaims_emitsEmptyList() {
  server.enqueue(MockResponse().setBody("[]"))
  donutsApi.getTodayClaims().subscribe(observer)

  observer.assertNoErrors()
  observer.assertValue(emptyList<User>())
  expect("/api/v1/claims/today") { server.takeRequest().path }
}
This will fail (or just hang) because we aren’t set up to talk to the server. We’ll use Retrofit as our HTTP client to do the heavy lifting for us. We will also include the RxJava 2 call adapter and Moshi type converter since we know those are the tools we are using:
dependencies {
  // ...
  compile "com.squareup.retrofit2:retrofit:2.1.0"
  compile 'com.jakewharton.retrofit:retrofit2-rxjava2-adapter:1.0.0'
  compile 'com.squareup.retrofit2:converter-moshi:2.1.0'
}
At a bare minimum, we should configure Retrofit to point to our mock web server, and use it to build our DonutsApi for us.
class DonutsApiTest {
  val retrofit by lazy { Retrofit.Builder().baseUrl(server.url("/")).build() }
  val donutsApi by lazy { retrofit.create(DonutsApi::class.java) }

  // ...
}
As we run this test, we can iterate over the errors we see until it finally passes. For the sake of brevity, I’ll just list each step below:
- Change
DonutsApifrom a class to an interface, and remove the method implementation. - Configure the Retrofit to use the
RxJava2CallAdapterFactory. - Configure the Retrofit to use the
MoshiConverterFactory. - Annotate the
getTodayClaims()method with a@GET. - Pass the expected path
(/api/v1/claims/today)as the parameter to the@GETannotation.
As we read our errors and fix each one as stated in the test, we ensure we don’t end up with anything we don’t need. Our final set of code should look like this:
class DonutsApiTest {
  @get:Rule val server = MockWebServer()

  private val observer by lazy { TestObserver<List<User>>() }

  val retrofit by lazy {
    Retrofit.Builder()
        .baseUrl(server.url("/"))
        .addCallAdapterFactory(RxJava2CallAdapterFactory.create())
        .addConverterFactory(MoshiConverterFactory.create())
        .build()
  }

  private val donutsApi by lazy { retrofit.create(DonutsApi::class.java) }

  @Test
  fun getTodayClaims_withNoClaims_emitsEmptyList() {
    server.enqueue(MockResponse().setBody("[]"))
    donutsApi.getTodayClaims().subscribe(observer)

    observer.assertNoErrors()
    observer.assertValue(emptyList<User>())
    expect("/api/v1/claims/today") { server.takeRequest().path }
  }
}

interface DonutsApi {
  @GET("/api/v1/claims/today")
  fun getTodayClaims(): Observable<List<User>>
}
After completing each step, we end up with a lovely green test and a clear example of how to use our DonutsApi. Now, let’s write a test for a happy day when we get some donuts:
class DonutsApiTest {
  // ...

  @Test
  fun getTodayClaims_withClaims_emitsListOfUsers() {
    val claimsJson = """
      [{
         "id": "63db9251-9c45-41ca-92d6-15e84ebea5b3",
         "github_login": "vgonda",
         "name": "Victoria Gonda",
         "display_name": "Victoria"
      },
      {
         "id": "02e54e6e-1501-4634-88b2-b8e10823c19b",
         "github_login": "shekibobo",
         "name": "Josh Kovach",
         "display_name": "Josh"
      }]
    """

    val user1 = User(
        id = "63db9251-9c45-41ca-92d6-15e84ebea5b3",
        github_login = "vgonda",
        name = "Victoria Gonda",
        display_name = "Victoria"
    )
    val user2 = User(
        id = "02e54e6e-1501-4634-88b2-b8e10823c19b",
        github_login = "shekibobo",
        name = "Josh Kovach",
        display_name = "Josh"
    )

    server.enqueue(MockResponse().setBody(claimsJson))
    donutsApi.getTodayClaims().subscribe(observer)

    observer.assertNoErrors()
    observer.assertValue(listOf(user1, user2))
    expect("/api/v1/claims/today") { server.takeRequest().path }
  }
}
At this point, we would expect this test to pass, but it turns out it doesn’t. When we look at the reason it failed, we can see that the test was comparing a list of users by their object IDs instead of by matching properties. This is because we haven’t defined equality between User objects. By making User a data class, Kotlin implements equals() and hashcode() for us based on the user’s properties. We make it a data class by adding the data keyword before our class declaration.
data class User(
  val id: String,
  val github_login: String,
  val name: String,
  val display_name: String
)
Run once more, and we should see all our tests running green. Finally, move the DonutsApi interface into its own file in the main source set, and run the tests once more to make sure everything still works.
Conclusion
In this post, we have outlined how to get started with Test Driven Development, and highlighted some of the benefits of proceeding this way: we can use our tests to generate code for us, and we can use our test feedback to guide us to write the code for our tests to pass. We have clear examples of how to use our code, and a test suite to ensure things continue to work going forward. In a future post, we will discuss how to use the DonutsApi to update the user interface to show the current state of donut availability.
To view other posts in this blog series broken down by OS, see below:
Both
Part 1 - How We Develop Mobile Applications - Best Practices
Android
Part 2 - Getting Our Environment Set Up for Android
iOS
About Victoria Gonda
Victoria is a software developer working on mobile and full stack web applications. She enjoys exchanging knowledge through conference talks and writing.
About Joshua Kovach
Josh’s skills include web and mobile development and he enjoys developing APIs and Android Apps. He is also a mentor on HackHands, pairing with programmers working through coding issues.
Comments
Thank you so much for this. I was into this issue and tired to tinker around to check if its possible but couldnt get it done. Now that i have seen the way you did it, thanks guys
with
regards